Making American Elderberry Cuttings
- Heather Wilson

- Jan 17
- 6 min read
Dig a little deeper into making elderberry cuttings from your own American elderberry plants.

At River Hills Harvest, our crew has made millions of American elderberry cuttings over the years. In fact, we've been making and planting dormant hardwood cuttings for over 20 years, whew! We have cut and planted about every way possible and learned not all ways lead to success. In recent years, The University of Missouri has conducted research in this area and has given us some great guidelines to follow.
Not all elderberries are the same
It should be noted that we are referring to American black elderberries, or Sambucus nigra subsp. canadensis. These elderberries are native to North America; there are other native elderberry types across the USA too. Our black American elderberries grow more shrublike in appearance than other treelike elderberries across the globe. They are easily able to be reproduced by taking hardwood cuttings when the plants are dormant.
Sambucus cerulea, or blue elderberry grows on the west coast and is more treelike than a shrub. There are groups who wild harvest the blue elderberries, but as an industry, we haven't found a very great way to plant them with success (yet!). The Sambucus nigra elderberries, commonly imported here to the USA from across the globe also grow differently and the process for reproducing these plants can vary.

Why dormant hardwood cuttings?
The American black elderberry alone has a genome over twice as large as a human's. We don't reproduce elderberry plants through planting seeds, just because we aren't sure what the outcome or growth habit of the plant will be (it's almost guaranteed to be different than the plant it came from). This is why you see us selling and growing named elderberry selections, such as Ranch and Bob Gordon. These elderberries were discovered and selected throughout the USA and put through trials that study their growth, resistance to certain pests and diseases, average brix and more. Through dormant hardwood cuttings, we are able to guarantee the same elderberry plant as before.
Click the button below to read our blog post about the Bob Gordon selection specifically.

Now, that's not to say you can't start elderberries from seed, but again, you may not get a desirable plant. This is why we also don't take cuttings from just any plant in the wild. It's possible you have a GREAT plant on your property, that's how our named selections were discovered as well. But we've also seen farmers plant acres of cuttings taken from wild plants and encounter a number of problems. These problems include susceptibility to elderberry mites and in the worst cases, not producing fruit at all.
If you would like to take cuttings from a wild plant, we would have you consider watching it for at least two years before you decide to plant too many of them.
We make elderberry cuttings from only desirable plants, in order to keep those qualities intact with the new plant. Dormant hardwood cuttings aren't the only way to buy elderberries to grow, but cuttings are the most cost effective. If you want to learn more about how elderberries are available throughout the year, click the button below to read our blog post, American Elderberries - How to Buy.
Timing Is Key
Dormant hardwood elderberry cuttings are taken when the plant is completely dormant. This allows stored energy in the cuttings to focus on establishing once they are planted in soil. Here in the Midwest our dormant season usually runs in January and February. It's important that cuttings are planted early and not stored for too long. The cooler the weather, the better for planting.

What You'll Need
Here's what you'll want to have on hand before making your elderberry cuttings:
A healthy plant(s) to take cuttings from, free from signs of pests or diseases.
A sharp and clean set of hand pruners for making the cuttings from the whole canes.
You may need a large set of clippers or chainsaw to cut the large canes initially.
A sanitizing solution commonly used is bleach, vinegar or hydrogen peroxide. An organic alternative is SaniDate. There are lots of options available, the choice is up to you.
A dormant oil to protect your cuttings, we use sesame oil.
Sphagnum moss or similar to keep cuttings moist while in storage.
Sealed plastic bags to store cuttings and moss in.

It's important that your hands, work area and equipment are all clean. You can run the risk of passing on disease or leaving debris that could cause mold in your cuttings. It's also important that you have a plan for where you'll plant your cuttings and how you will tend to them.
If you are planning to start elderberries, we recommend reading our blog post on mitigating your risks. Click the button below to start reading it now.
Start with Whole Canes
Start by cutting your canes from the healthy elderberry plant with your large clippers, nearly at the ground. You may choose to coppice higher, but that's a blog post for another day. For now, whatever height you desire to coppice to, cut the whole canes there and gather them up. Discard any tiny canes or canes that appear to have pest damage or disease. Cuttings around 1/2 inch or larger are desirable, smaller cuttings can work too but aren't as successful.
We recommend making angled cuts, just so later you can remember which way is the bottom of the cane. Sometimes once you have your bundled canes, they can be deceiving as to which way is down or up.
Time to Chop
Start by pulling one whole cane from your bundle.
An elderberry cutting should have two sets of nodes. Look at the photos below to determine where your node sets are and what they look like. Generally, you can get more than one cutting out of one whole cane.
Select only clean canes free of damage.
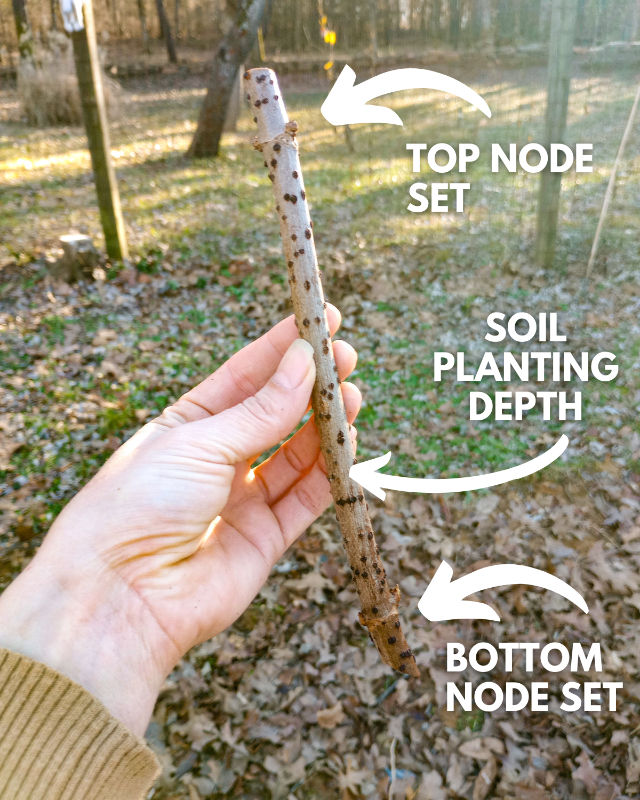


Once you've located the two sets of nodes on a good cutting, make a cut around 1-2 inches below the bottom node set. We recommend making this cut an angled cut so you can remember which way goes in the soil later on.
Above the top node set, now make a straight cut around 1-2 inches above the set of nodes.
Now you have an elderberry cutting! Woo hoo!
Finishing the Process
Now you want to sanitize your cuttings. This can be done by dipping your cuttings into your chosen solution for that solution's recommended amount of time. Some resources we've found recommend a 10% bleach solution, a 0.3% hydrogen peroxide solution and some prefer a simple soap and water wash. How long you soak your cuttings is going to depend on the recommendations of the solution you use. Rinse and let the cuttings mostly dry after.
Now it's time to protect your babies! A dormant oil such as the sesame oil we use, helps control any elderberry mites or pests that may be trying to overwinter in the cuttings. The cuttings are simply dipped in this solution. Then we are able to add the moist sphagnum moss into a bag and store the cuttings in the refrigerator.
Cuttings can be stored for weeks or up to months in the refrigerator, but it's a best practice to get them out of there and planted asap. Ensure your bags are sealed, as you don't want the gasses from your produce to get on the cuttings.
Your next step is to plant your elderberry cuttings! Click the button below to read our blog post relating directly to this: Planting Dormant Hardwood American Elderberry Cuttings:

Want to Purchase American Elderberry Cuttings?
Yearly, in the late fall we open up pre-orders for dormant hardwood cuttings. These are shipped out starting in January and continue through February. We are a certified nursery, and you can choose from many named selections. Once you've established your elderberry plants from cuttings, you can make your own cuttings from them after they are two years old. Click below to visit our Plants & Supplies page on our website to see what elderberry plants we have available now and browse our processing equipment.
Until next time friends, cheers to your health!
Heather

I am Heather Wilson, of the River Hills Harvest crew. By being part of the company, I am blessed to have access to American elderberries in all forms. I enjoy experimenting with new ways to incorporate them into my diet, as well as other natural plants, berries and more. I have a background in greenhouse management as well as floral design and am involved in the art community as an artist, when time allows. I enjoy playing guitar and writing songs. I also enjoy wandering in nature with no real purpose, because a purpose always presents itself. It’s a busy life, but one that I love and feel lucky to be a part of.


Comments